Getting started with MRTK
![]()
The Mixed Reality Toolkit (MRTK) is a cross-platform toolkit for building Mixed Reality experiences for Virtual Reality (VR) and Augmented Reality (AR).
Prerequisites
To get started with the Mixed Reality Toolkit, you will need:
-
MRTK supports both IL2CPP and .NET scripting backends on Unity 2018
-
This is necessary if you are building a UWP app for WMR, HoloLens 1, or HoloLens 2. This is not necessary when building for OpenVR.
Add MRTK to your Unity project
Required
- Get the latest MRTK Unity packages
- Import MRTK packages into your Unity project
- Switch your Unity project to the target platform
- Add MRTK to a new scene or new project
Optional
- Getting started tutorials
- XR SDK getting started guide (Unity 2019.3 or later).
- Learn about the core building blocks of MRTK
- Run the HandInteractionExamples scene in the Unity Editor
Get the latest MRTK Unity packages
- Go to the MRTK release page.
- Under Assets, download:
- Microsoft.MixedRealityToolkit.Unity.Foundation.unitypackage
- (Optional) Microsoft.MixedRealityToolkit.Unity.Extensions.unitypackage
- (Optional) Microsoft.MixedRealityToolkit.Unity.Tools.unitypackage
- (Optional) Microsoft.MixedRealityToolkit.Unity.Examples.unitypackage
For information on package contents, see MRTK Package Contents.
The Mixed Reality Toolkit is also available for download on NuGet.org; for details see MRTK NuGet Packages.
Import MRTK packages into your Unity project
- Create a new Unity project, or open an existing project. When creating a project, make sure to select "3D" as the template type.
- Import the Microsoft.MixedRealityToolkit.Unity.Foundation.unitypackage you downloaded by going into "Asset -> Import Package -> Custom Package", select the .unitypackage file, ensure all items to import are checked, and then select "Import".
- (Optional) Import the Microsoft.MixedRealityToolkit.Unity.Examples.unitypackage following the same steps as above. The examples package is optional and contains useful demonstration scenes for current MRTK features.
- (Optional) Import the Microsoft.MixedRealityToolkit.Unity.Tools.unitypackage following the same steps as the foundation package. The tools package is optional and contains useful tools, such as the ExtensionServiceCreator, that enhance the MRTK developer experience.
- (Optional) Import the Microsoft.MixedRealityToolkit.Unity.Extensions.unitypackage following the same steps as the foundation package. The extensions package provides a set of useful optional components for the MRTK.
Note
Android and iOS development require additional package installations. For more information, see How to configure MRTK for iOS and Android. After importing the Foundation package, you may see a prompt similar to the following:
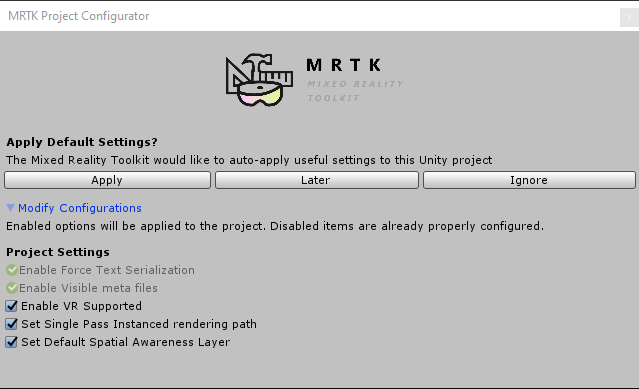
MRTK is attempting to set up your project for building Mixed Reality solutions by doing the following:
- Enable XR Settings for your current platform (enabling the XR checkbox).
- Force Text Serialization / Visible Meta files (recommended for Unity projects using source control).
Accepting these options is completely optional, but recommended.
Some prefabs and assets require TextMesh Pro, meaning you need the TextMesh Pro package installed and the assets in your project (Window -> TextMeshPro -> Import TMP Essential Resources). After you import TMP Essentials Resources, you need to restart Unity to see changes.
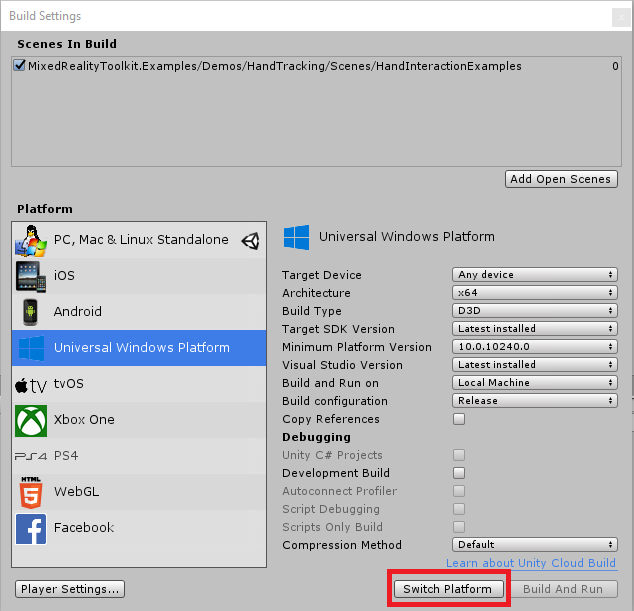
Switch your Unity project to the target platform
With the packages imported, the next step is to select the correct platform for the application.
To create a HoloLens application, switch to the Universal Windows Platform:
- Open menu : File > Build Settings
- Select Universal Windows Platform in the Platform list
- Click the Switch Platform button
Note
The Mixed Reality Toolkit will prompt to apply recommended changes to the project when the platform is selected. Whenever the platform is switched, the appropriate settings will be checked and prompted, if necessary.
Add MRTK to a new scene or new project
Create a new Unity project, or start a new scene in your current project.
Make sure you have imported the MRTK packages (we recommend both Foundation and Examples, though Examples is not required) following the steps above.
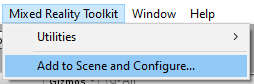
From the menu bar, select Mixed Reality Toolkit -> Add to Scene and Configure
The inspector will now show the currently active MRTK configuration profile and the profile selection dropdown, where the default profile is already preselected. Profiles configure the behavior of MRTK core components and are described in more detail in the profiles article.
Note
- If you're using Unity's XR SDK in Unity 2019.3 or later, you should choose the "DefaultXRSDKConfigurationProfile". This profile is set up with MRTK's XR SDK systems and providers, where needed.
- If you're getting started on the HoloLens or HoloLens 2, you should choose the "DefaultHoloLens1ConfigurationProfile" or DefaultHoloLens2ConfigurationProfile" instead.
- See the profiles for more information on the differences between DefaultMixedRealityToolkitConfigurationProfile and DefaultHoloLens2ConfigurationProfile.
You will then see the following in your Scene hierarchy:

Which contains the following:
- Mixed Reality Toolkit - The toolkit itself, providing the central configuration entry point for the entire framework.
- MixedRealityPlayspace - The parent object for the headset, which ensures the headset / controllers and other required systems are managed correctly in the scene.
- The Main Camera is moved as a child to the Playspace - Which allows the playspace to manage the camera in conjunction with the SDKs
Note
While working in your scene, DO NOT move the Main Camera (or the MixedRealityPlayspace) from the scene origin (0,0,0). This is controlled by the MRTK and the active SDK. If you need to move the players start point, then move the scene content and NOT the camera!
Press Play and test out hand simulation by pressing the spacebar.
You are now ready to build and deploy to device! Follow the steps instructions at Build and Deploy MRTK.
Getting started tutorials
If you are new to MRTK, or MR development, we recommend you check out the Getting started tutorials which uses MRTK v2.
Learn about the core building blocks of MRTK
Check out MRTK 101: How to use Mixed Reality Toolkit Unity for Basic Interactions (HoloLens 2, HoloLens, Windows Mixed Reality, Open VR) to learn about core building blocks.
Run the HandInteractionExamples scene in the Unity Editor
The hand interaction examples scene article is a great place to learn more about the UX controls and interactions in MRTK.
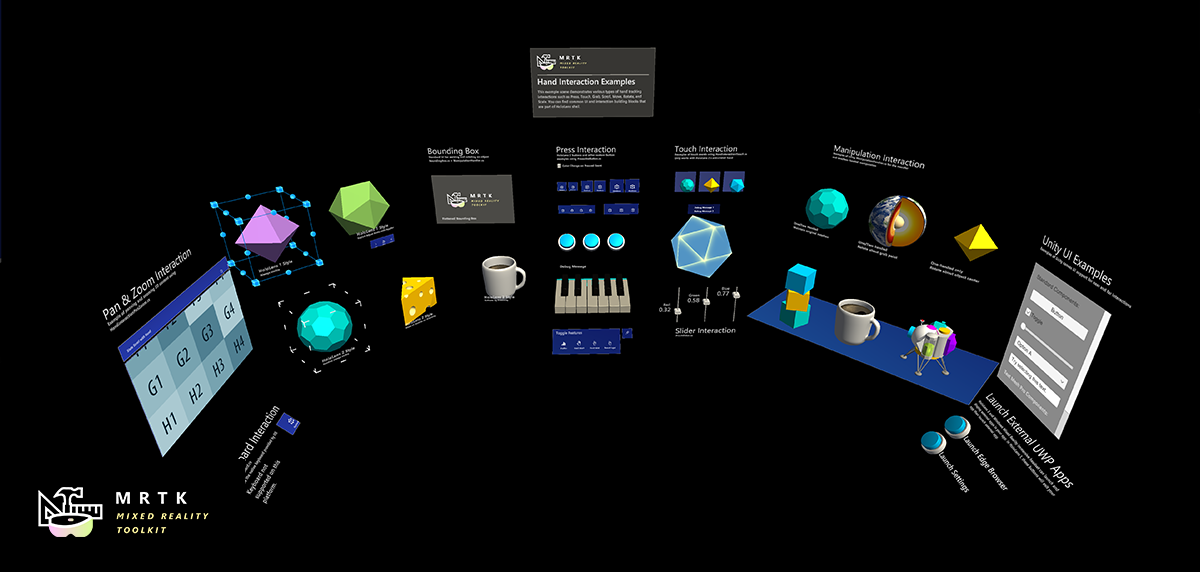
To try the hand interaction scene, do the following steps.
Open the HandInteractionExamples scene under
Assets\MixedRealityToolkit.Examples\Demos\HandTracking\Scenes\HandInteractionExamplesYou may get a prompt asking you to import "TMP Essentials".
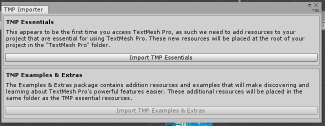
If you get such a prompt, select the "Import TMP essentials" button. "TMP Essentials" refers to Text Mesh Pro plugin, which some of the MRTK examples use for improved text rendering. (See Text in Unity for more detailed information)
Close the TMP dialog. After this you need to reload the scene. You can do this by double-clicking the scene in the Project tab.
Press the Play button.
Using the in-editor hand input simulation to test a scene
The in-editor input simulation allows you to test virtual object behavior given a specific type of input such as hands or eyes.
How to move around in the scene:
- Use W/A/S/D keys to move the camera forward/left/back/right.
- Use Q/E to move the camera vertically.
- Press and hold the right mouse button to rotate the camera.
How to simulate hand input:
- Press and hold the spacebar to enable the right hand.
- While holding the space bar, move your mouse to move the hand.
- Use the mouse scroll wheel to adjust the depth of the hand.
- Click the left mouse button to simulate pinch gesture.
- Use T/Y keys to make the hand persistent in the view.
- Hold CTRL key and move the mouse to rotate the hand.
Have fun exploring the scene! You can learn more about the UI controls in the hand interaction examples guide. Also, read through input simulation docs to learn more about in-editor hand input simulation in MRTK.
Congratulations, you just used your first MRTK scene. Now onto creating your own experiences...
Next steps
Here are some suggested next steps:
- Check out MRTK 101: How to use Mixed Reality Toolkit Unity for Basic Interactions to learn about how to achieve common spatial interactions such as grab, move, scale, and rotate.
- Learn about the UX controls available in MRTK in UI and interaction building blocks.
- Try MRTK Examples Hub (pre-built app packages are included in the release page for your convenience)
- Learn how to work with the MRTK Configuration profile in the mixed reality configuration guide.
- Learn about the MRTK's Architecture
- Learn about the MRTK's Input System
- Learn about the MRTK's Tools that will empower your mixed reality design and development.
- Read through input simulation guide to learn how to simulate hand input in editor.
Getting help
If you run into issues caused by MRTK or otherwise have questions about how to do something, there are a few resources that can help:
- For bug reports, please file an issue on the GitHub repo.
- For questions, please reach out on either StackOverflow or the mixed-reality-toolkit channel on Slack. You can join the Slack community via the automatic invitation sender.
Upgrading from the HoloToolkit (HTK/MRTK v1)
There is not a direct upgrade path from the HoloToolkit to Mixed Reality Toolkit v2 due to the rebuilt framework. However, it is possible to import the MRTK into your HoloToolkit project and migrate your implementation. For more information, see the HoloToolkit to Mixed Reality Toolkit Porting Guide
Getting started with Unity's XR SDK
Complete instructions and information can be found in our XR SDK getting started guide.